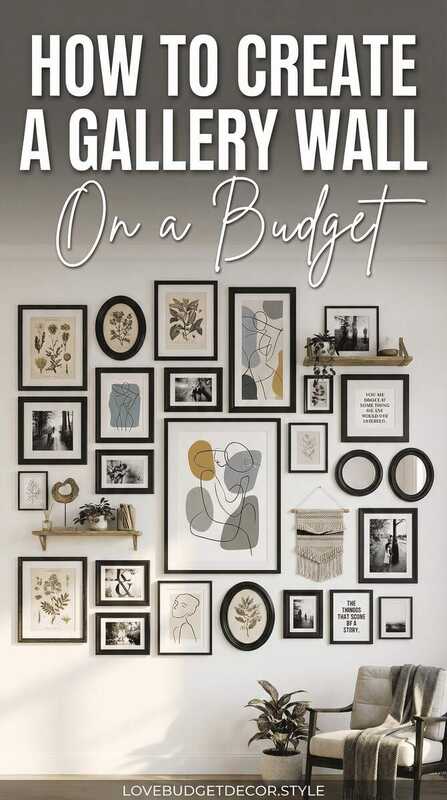
A gallery wall transforms a blank expanse into a curated collection that tells your story, showcases your style, and becomes the focal point of any room. The best part? Creating a stunning gallery wall requires more creativity than cash, making it one of the most impactful budget decorating projects you can tackle.
Share This Article
Planning Your Gallery Wall Layout
The secret to a professional-looking gallery wall is planning before you hammer a single nail. Start by measuring your wall space and determining the overall dimensions of your gallery. A good rule of thumb is to leave at least six to twelve inches of space between the edge of your gallery and any furniture below it, and to keep the center of your arrangement at eye level, typically around 57 to 60 inches from the floor.
Create templates of your frames using craft paper or newspaper cut to the exact dimensions of each frame. Tape these templates to the wall, experimenting with different arrangements until you find a layout that feels balanced and visually appealing. This step costs nothing but time and prevents the frustration of multiple nail holes from trial and error. Take photos of different arrangements to compare them side by side, and do not be afraid to live with the paper templates for a few days to ensure you love the layout before committing.
Gallery Wall Layout Styles
Grid Layout: Uniform frames arranged in perfect rows and columns create a clean, modern aesthetic. This style works best with matching frames and similar-sized artwork, creating order and symmetry that feels intentional and sophisticated.
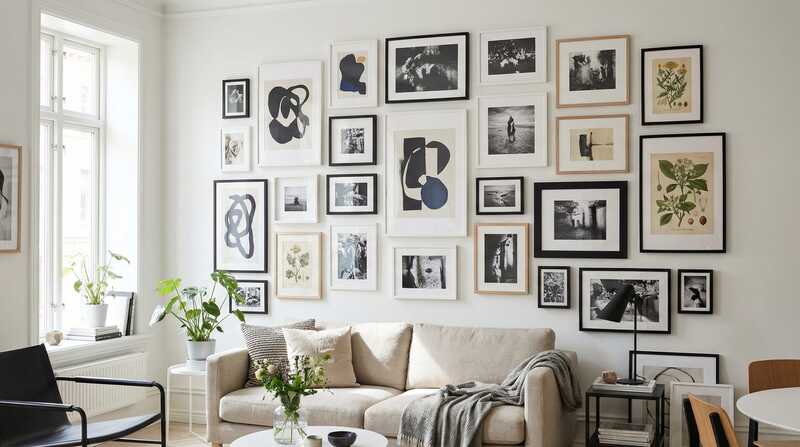
Salon Style: A more eclectic approach featuring frames of varying sizes, styles, and orientations arranged organically. This traditional style allows for maximum creativity and works beautifully with mismatched frames and diverse artwork.
Linear Layout: Frames arranged in a single horizontal or vertical line create a streamlined look perfect for hallways or above furniture. This style requires less planning than other layouts and works well with three to five frames of varying sizes.
Sourcing Affordable Frames
Frames can be the most expensive component of a gallery wall, but they do not have to be. Thrift stores, estate sales, and online marketplaces offer vintage and secondhand frames at a fraction of retail prices. Do not worry if the frames are mismatched or outdated—a coat of spray paint in a unified color creates cohesion while maintaining character. Black, white, gold, and natural wood are timeless choices that work with any decor style.
Dollar stores and discount retailers sell basic frames for just a few dollars each, making them perfect for budget gallery walls. While the quality may not rival high-end frames, they serve their purpose beautifully when grouped together. Mix frame sizes and orientations to create visual interest, and remember that the artwork matters more than the frame itself.
Frame sets specifically designed for gallery walls offer the best value, providing multiple coordinating frames at a lower per-frame cost than buying individually. These sets typically include a mix of sizes and sometimes come with hanging templates, making installation easier. Look for sets during holiday sales or use retailer coupons to maximize savings.
Best Budget Frame Options
Finding and Creating Affordable Artwork
You do not need to be an art collector to create a beautiful gallery wall. Free printable art websites offer thousands of high-quality designs that you can download and print at home or at a local print shop for just a few dollars. From botanical prints to abstract designs to vintage maps, these resources provide professional-quality artwork at no cost beyond printing.
Your own photography makes for the most personal and meaningful gallery wall content. Print your favorite travel photos, family moments, or nature shots to create a collection that truly reflects your life and experiences. Many online print services offer high-quality prints for under five dollars each, and the emotional value far exceeds the minimal cost.
Create your own abstract art using canvas boards and acrylic paint from craft stores. Even if you do not consider yourself artistic, simple techniques like color blocking, drip painting, or geometric designs create modern, sophisticated pieces that look intentional and expensive. A set of canvas boards and basic acrylic paints costs under twenty dollars and can yield multiple pieces of original artwork.
Thrift stores and flea markets often have framed artwork for just a few dollars. Even if you do not love the art itself, the frame may be worth the purchase. Replace the artwork with your own prints or creations, instantly upgrading the piece while saving money on framing costs. Old book pages, sheet music, vintage postcards, and botanical illustrations from secondhand books make charming and budget-friendly gallery wall content.
Creating Visual Cohesion
A successful gallery wall balances variety with cohesion, creating visual interest without chaos. Choose a unifying element that ties your collection together—this could be a consistent color palette, similar frame styles, a common theme, or matching mats. This unifying element allows you to mix different types of artwork and frame sizes while maintaining a cohesive, intentional appearance.
Color coordination creates harmony even when mixing different art styles and subjects. Limit your palette to three to four main colors that appear throughout your collection, ensuring these colors complement your room's existing decor. Black and white photography naturally creates cohesion, while colorful prints benefit from repeating specific hues across multiple pieces.
Consistent matting adds a professional touch and helps unify mismatched frames. White or cream mats work with any frame color and create breathing room around artwork, making even small prints feel more substantial. Pre-cut mats cost just a few dollars at craft stores, or you can cut your own using a mat cutter and mat board for even greater savings.
Spacing between frames matters as much as the frames themselves. Maintain consistent spacing of two to three inches between frames for a polished, intentional look. Too much space makes the gallery feel disconnected, while too little creates visual clutter. Use a level and measuring tape to ensure frames are properly aligned, as even slight variations become obvious once everything is hung.
Installation Tips and Tricks
Proper installation prevents crooked frames and unnecessary wall damage. Start by hanging the central or largest piece first, using it as an anchor for the rest of your arrangement. Work outward from this central piece, maintaining consistent spacing and alignment as you go. A laser level makes this process significantly easier and costs around fifteen dollars, but a traditional bubble level works perfectly well for smaller galleries.
Picture hanging strips offer a damage-free alternative to nails, making them ideal for renters or anyone hesitant to put holes in walls. These adhesive strips hold surprisingly heavy frames and remove cleanly without damaging paint. While they cost slightly more than traditional picture hangers, the flexibility and wall protection they provide make them worth the investment for many situations.
For traditional hanging methods, use appropriate hardware for your wall type and frame weight. Drywall anchors prevent frames from pulling out of the wall, while picture hooks rated for specific weights ensure secure hanging. Invest in a variety pack of hanging hardware for under ten dollars, giving you options for frames of all sizes and weights.
Gallery Wall Themes and Ideas
Travel Gallery: Showcase your adventures with maps, travel photos, and postcards from places you have visited. Include ticket stubs, foreign currency, or small souvenirs in shadow boxes to create a three-dimensional travel memoir that sparks conversation and happy memories.
Family Photo Wall: Create a living family history with photos spanning generations. Mix vintage family photos with recent snapshots, using consistent black and white processing or sepia tones to unify different eras and photo qualities. This approach turns your wall into a meaningful family archive that grows and evolves over time.
Botanical Gallery: Pressed flowers, botanical prints, and nature photography create a serene, organic gallery perfect for bedrooms or bathrooms. This theme works beautifully with natural wood frames and creates a connection to the outdoors regardless of your actual view.
Typography and Quotes: Inspirational quotes, song lyrics, or meaningful words create an uplifting gallery that reflects your values and personality. Mix different fonts, sizes, and styles to create visual interest while maintaining a cohesive message. Free printable quote art makes this theme especially budget-friendly.
Eclectic Mix: Combine different art styles, subjects, and mediums for a collected-over-time aesthetic that feels personal and curated. This approach allows you to add pieces gradually as you find them, building your gallery organically rather than completing it all at once.
Maintaining and Updating Your Gallery Wall
Gallery walls should evolve with you, not remain static forever. Design your layout with flexibility in mind, leaving space to add new pieces or swap out artwork as your tastes change or you acquire new favorites. This living approach keeps your gallery fresh and relevant, preventing it from feeling dated or stale.
Seasonal updates breathe new life into your gallery without starting from scratch. Swap a few key pieces to reflect the season—autumn leaves in fall, beach photos in summer, or cozy winter scenes during cold months. This rotation keeps your space feeling current and allows you to display more of your collection throughout the year.
Regular dusting and cleaning keep your gallery looking fresh. Use a microfiber cloth to gently dust frames and glass, and check periodically that frames remain level and secure. UV-protective glass or acrylic helps prevent fading if your gallery receives direct sunlight, preserving your artwork for years to come.
Key Takeaways
Creating a stunning gallery wall on a budget requires planning, creativity, and patience, but the results rival expensive designer installations. By sourcing affordable frames, creating or finding budget-friendly artwork, maintaining visual cohesion, and installing carefully, you can transform any blank wall into a curated collection that tells your story and elevates your entire space. Start small, add pieces gradually, and enjoy the process of building a gallery that truly reflects who you are.
Related Articles
Affiliate Disclosure: This article contains affiliate links. If you purchase through these links, we may earn a small commission at no additional cost to you.