A kitchen backsplash protects your walls from splashes and stains while serving as a stunning focal point that can completely transform your kitchen's aesthetic. The good news? You do not need to hire a contractor or spend thousands of dollars to achieve a professional-looking backsplash that elevates your entire space.
Share This Article
Peel-and-Stick Tile: The Renter's Dream
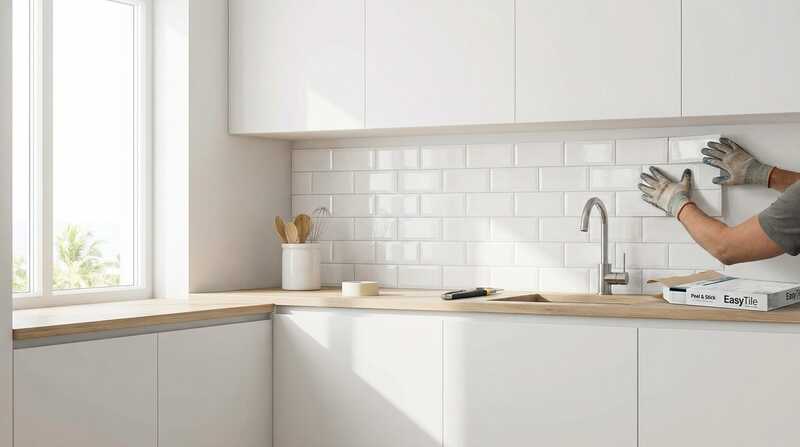
Peel-and-stick tiles have revolutionized DIY backsplashes, offering an affordable, removable solution that requires no special tools or skills. These self-adhesive tiles come in countless styles—from subway tile to mosaic to faux marble—and can be installed in a single afternoon. Most importantly, they remove cleanly without damaging walls, making them perfect for renters who want to upgrade their space without losing their security deposit.
Quality peel-and-stick tiles have improved dramatically in recent years, with many options featuring realistic textures and finishes that rival traditional tile. Look for tiles with strong adhesive backing and heat-resistant properties, especially for areas near the stove. A standard kitchen backsplash covering approximately 30 square feet costs between sixty and one hundred and twenty dollars in peel-and-stick tiles, depending on the style and quality you choose.
Installation is straightforward: clean the wall thoroughly, measure and mark your layout, peel off the backing, and press the tiles firmly into place. Start from the bottom and work your way up, ensuring each tile is level before moving to the next. Use a utility knife to trim tiles around outlets and edges, and consider using a roller or squeegee to ensure strong adhesion. The entire project typically takes three to five hours, including prep and cleanup.
Top Peel-and-Stick Tile Options
Art3d Peel and Stick Backsplash Tiles
10-sheet pack, subway tile design, heat resistant
$30-$50
View on Amazon
Utility Knife and Straight Edge Set
For cutting tiles to fit around outlets and edges
$10-$20
View on AmazonPainted Backsplash: Maximum Impact, Minimal Cost
Paint offers the most budget-friendly backsplash solution, costing as little as twenty to forty dollars for a complete kitchen. While paint alone works for areas with minimal water exposure, adding a clear protective coating creates a durable, wipeable surface suitable even behind sinks and stoves. Semi-gloss or high-gloss paint naturally resists moisture better than flat finishes, making cleanup easier while adding a subtle sheen that reflects light and brightens your kitchen.
Get creative with painted backsplashes by using stencils to create patterns that mimic expensive tile. Moroccan, geometric, or floral stencils applied in contrasting colors create stunning visual impact for under fifty dollars total. This technique requires patience and careful taping, but the results rival custom tile work at a fraction of the cost. Use painter's tape to create clean lines, and apply thin coats of paint to prevent bleeding under the stencil.
For a modern, industrial look, consider chalkboard paint as a backsplash. This unconventional choice creates a functional surface for grocery lists, recipes, or artwork while adding dramatic contrast to white or light-colored cabinets. Magnetic chalkboard paint takes this concept further, allowing you to attach notes and photos with magnets. Seal chalkboard paint with a food-safe sealer in areas near food preparation surfaces.
Beadboard and Paneling: Cottage Charm on a Budget
Beadboard paneling creates a classic, cottage-style backsplash with wonderful texture and dimension. Pre-finished beadboard panels cost between twenty and forty dollars per four-by-eight-foot sheet, and installation requires only basic carpentry skills and tools. Cut panels to fit your backsplash area, attach them to the wall with construction adhesive and finishing nails, and paint or seal as desired. The vertical lines of beadboard add visual height to kitchens while hiding wall imperfections.
Shiplap offers a similar aesthetic with a more modern, farmhouse feel. Real wood shiplap can be expensive, but affordable alternatives include MDF shiplap panels or even thin plywood strips installed with small gaps between boards to mimic authentic shiplap. Paint in crisp white for a clean, bright look, or choose a bold color to make your backsplash a statement feature. Seal wood-based backsplashes with polyurethane or another water-resistant finish to protect against kitchen moisture.
Wainscoting panels provide another textured option that adds architectural interest to plain walls. These panels come in various styles from simple flat panels to more ornate raised designs, allowing you to match your kitchen's aesthetic. Install them horizontally for a modern twist on traditional vertical wainscoting, creating a unique backsplash that stands out from typical tile installations.
Tin Ceiling Tiles: Vintage Glamour
Tin ceiling tiles repurposed as backsplash create stunning vintage character with embossed patterns and metallic finishes. While authentic antique tin tiles can be expensive, reproduction tiles offer the same look for thirty to sixty dollars per two-by-four-foot panel. These lightweight panels attach directly to walls with construction adhesive, and their reflective surfaces bounce light around the kitchen, making spaces feel larger and brighter.
Tin tiles come in various finishes including brushed nickel, copper, and aged brass, allowing you to coordinate with your kitchen hardware and fixtures. The embossed patterns range from simple geometric designs to elaborate Victorian motifs, providing options for any style preference. Clean tin backsplashes with mild soap and water, avoiding abrasive cleaners that might damage the finish.
For a more industrial aesthetic, consider using actual corrugated metal panels as backsplash. These panels cost around twenty to thirty dollars per sheet and create bold, contemporary style perfect for modern or loft-style kitchens. The corrugated texture adds dimension while the metal surface provides excellent durability and easy cleaning.
Creative Alternative Materials
Vinyl Wallpaper: Modern vinyl wallpapers designed for kitchens and bathrooms offer water resistance and easy cleaning while providing endless pattern options. Geometric, botanical, or faux tile patterns create visual interest for thirty to sixty dollars, and installation requires only wallpaper paste or pre-pasted options that activate with water. Choose wipeable vinyl specifically rated for kitchen use to ensure durability.
Laminate Sheets: The same laminate used for countertops works beautifully as backsplash material. Available in countless colors and patterns including realistic stone and wood looks, laminate sheets cost forty to eighty dollars and can be cut to size and attached with construction adhesive. The seamless surface makes cleaning effortless, and the durability rivals traditional tile.
Mirror Tiles: Mirrored backsplash tiles reflect light and views, making small kitchens feel more spacious. Peel-and-stick mirror tiles eliminate the complexity of traditional mirror installation while providing the same light-enhancing benefits. Use them as a full backsplash or create an accent strip for subtle glamour. These tiles cost between forty and eighty dollars for a standard backsplash area.
Reclaimed Wood: Salvaged wood planks create rustic, organic backsplashes full of character. Source wood from pallets, old fencing, or architectural salvage yards for minimal cost, then clean, sand, and seal the wood before installation. The varied tones and textures of reclaimed wood add warmth and personality impossible to achieve with new materials. Ensure proper sealing to protect against moisture and food stains.
Installation Tips for Success
Proper surface preparation ensures your backsplash adheres correctly and lasts for years. Clean walls thoroughly with TSP (trisodium phosphate) or a degreasing cleaner to remove any cooking residue, grease, or dirt. Allow walls to dry completely before beginning installation. Fill any holes or imperfections with spackle, sand smooth, and wipe away dust. A clean, smooth surface is essential for adhesive products like peel-and-stick tiles.
Measure carefully and mark your layout before cutting or adhering any materials. Use a level to ensure your first row is perfectly straight, as this establishes the foundation for the entire installation. For tile patterns, dry-fit your layout first to determine the best starting point and minimize small cuts at edges. Taking time to plan prevents costly mistakes and ensures professional-looking results.
Work in small sections rather than trying to complete the entire backsplash at once. This approach allows you to focus on precision and make adjustments as needed. For adhesive products, press firmly and smooth out any air bubbles immediately. Use a roller or squeegee to ensure complete contact between the material and wall, which is crucial for long-term adhesion.
Seal edges and seams appropriately for your chosen material. Caulk along countertops and around outlets prevents moisture infiltration and creates a finished, professional appearance. Choose clear or color-matched caulk for the most seamless look. For painted or wood backsplashes, apply appropriate sealers to protect against moisture, heat, and stains, ensuring your backsplash remains beautiful and functional for years.
Maintenance and Longevity
Different backsplash materials require different care routines. Tile and laminate surfaces clean easily with mild dish soap and water, while wood and painted surfaces may need gentler treatment to avoid damage. Avoid abrasive scrubbers on any surface, as they can scratch and dull finishes over time. Wipe up spills promptly, especially acidic substances like tomato sauce or lemon juice that can stain or etch certain materials.
Inspect adhesive-backed materials periodically for any lifting or peeling, especially in high-heat areas near the stove. Most quality peel-and-stick products remain secure for years, but edges may occasionally need re-pressing or a small amount of additional adhesive. Catching and addressing small issues early prevents larger problems and extends the life of your backsplash.
Resealing wood or painted backsplashes every one to two years maintains their protective barrier against moisture and stains. This simple maintenance task takes minimal time and ensures your backsplash continues looking fresh and new. Choose food-safe sealers for areas near food preparation surfaces, and always ensure adequate ventilation when applying sealers or finishes.
Key Takeaways
A beautiful, functional kitchen backsplash does not require professional installation or a massive budget. Whether you choose peel-and-stick tiles for convenience, paint for affordability, or alternative materials for unique character, you can transform your kitchen's look for under two hundred dollars. The key is choosing materials appropriate for your skill level and kitchen's needs, preparing surfaces properly, and taking your time during installation. The result will be a custom backsplash that looks professionally installed while costing a fraction of traditional tile work.
Related Articles


Affiliate Disclosure: This article contains affiliate links. If you purchase through these links, we may earn a small commission at no additional cost to you.
